You have a couple of options here, depending on your subject matter.
i. Most digital cameras have a "shutter burst" or multi-shot function, where by holding down the shutter button it takes a burst of photos in rapid succession. This is a good option if you are using an animated object (for example a person or a moving object like a car).
ii. Your other option is to set your camera up on a tripod in front of your inanimate object. Take a photo, move your object slightly, take another photo, move your object slightly... repeat.
Remember, that a moving image is generally 25 frames per second. That's 100 pictures for 4 seconds. Or 1500 for 1 minute! For stop motion, we don't have to adhere to this too closely, as it is the stop part which gives it its character. So you might like to opt for half that, so 12 frames per second, for example, is perfect for Stop Motion.
Editing your images
You can edit your photos in photoshop if you want to, but remember you will need to be consistent, it may look odd if you only edit a couple and not the rest. Save as jpgs.
Putting it altogether
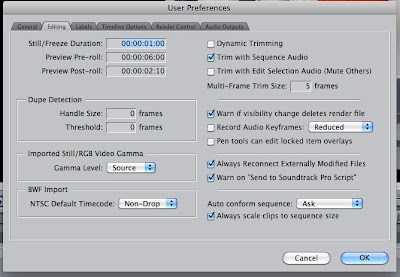
Open Final Cut Pro. First things first, click on Final Cut Pro in the menu bar > User preferences > Editing tab > Still/freeze duration. Change the time for how long you want your individual photos to play for. It is in the format of hh:mm:ss:ff so you will change the frames. If you are working to 12 frames per second for example, it would be 00:00:00:02 (as there are 24 or 25 frames per second).

Import all of your photos. File > import > Files. You can select more than one by holding down the shift key. It is a good idea to have them in order already, so that when you start putting them together in your timeline you won't have to search, and you can just simply select them all and drag and drop into your timeline.
You can add effects, the easiest way to do this is to export your animation as a Quicktime, then import it back into Final Cut, then add the effect to the whole clip. Export again as a Quicktime when complete.
You may also like to have music, if it is an mp3 or wav you can simply drag and drop the music file into your timeline.
To change the length of the still frames all at once, you can select all > command click > duration. Then change the number of frames you want the stills to run for. Remembering the time code (00:00:00:00) is in hours:minutes:seconds:frames
ReplyDeleteWith ProSlideshow Secluded from Pixel Film Studios making a slideshow has never been so fun and simple to do. Clients can choose from a course of action of adapted layouts alongside simple to utilize advances. With ProSlideshow: Particular every client has finish control over each layer's position, surface overlay, scale, and all the more all inside Final Cut Pro X Plugins
ReplyDelete