Create new project. Name and choose location to save project.
Select relevant aspect ratio (standard or widescreen)
Before doing anything else, we need to make sure the settings are correct. In the menu bar > iDVD > Preferences > General > Uncheck show Apple watermark.
Projects > Video Mode: PAL
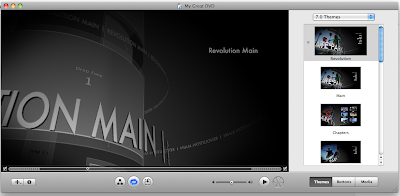
When it opens it will look like this:

^ Info button ^ Show Drop Zones ^Play
Playing in the centre is what the DVD menu looks like. Running along the right hand side is the menu themes you can choose from. Select a theme if you want a menu. You will notice grey 'drop zones', these are areas where you can drag and drop still images or video to play like previews before the the DVD plays. Be sure to drag and drop the image/video directly into the drop zone, other wise you will be adding a video or image to be played. Depending on which theme you have chosen there may be more than one drop zone. Click on the show drop zones button to identify all of them.
Click on the Info button (bottom left of the screen). It will give you the menu info where you can choose the music or the loop duration of the background for example.
It is not necessary to have a menu, as you can set the DVD to play as soon as it is inserted into the drive or player.
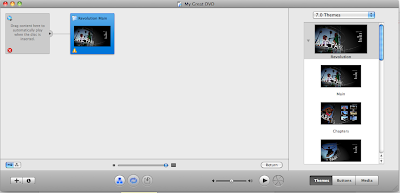
Click on DVD map (first button of the three in the middle)

^ DVD map
This shows you the flow of the DVD. As you can see you can drag contents into the first box to play automatically when inserted. I would use this option if I were showing a video piece at an exhibition on a loop.

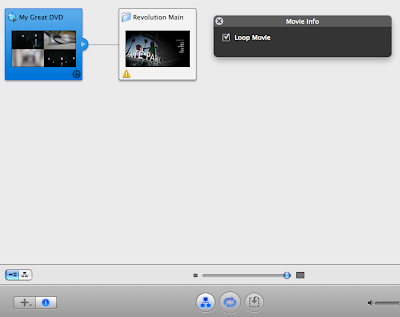
^ Info button
Here I have dragged my video directly into the first box, then clicked on the Info button bottom left. The grey movie info dialogue box opened, I clicked on Loop Movie. This means that my movie will automatically play looped when inserted into the player.
You can add multiple videos or slideshows. It will look like this in the DVD map view:
If you click on the video titles (seen here under Revolution Main), then the info tab you can change the font, colour etc.
If you click on any of that text (ie Revolution main, sequence 2, test) you can rename them too.
You can preview your DVD at any time by clicking on the play arrow.
Once you are happy with your DVD, click on the burn button directly next to the play button.
It will direct you to insert a blank DVD. Then it will proceed to burn the DVD. You can make multiple copies easily by inserting another blank DVD when it has finished the first.


No comments:
Post a Comment